Showing posts with label recipes. Show all posts

Monday, September 29, 2014

Perfect Pumpkin Crumble Muffins

Are you one of those people that goes pumpkin crazy come September? I hate to say I am, but I did get pretty excited when I saw the new pumpkin section at Trader Joes today. I absolutely could not leave without a box of This Pumpkin Walks Into the Bar... Probably just because they had a fun name, but whatever. I had one for dinner tonight, and they were delicious. Yea. I'm healthy I know.

Anyways, speaking of pumpkin, you have to try these pumpkin crumble muffins. They are the perfect blend of pumpkin and sweetness. They aren't over the top, I think I just gave myself a cavity sweet, but just sweet enough so you can eat one for breakfast and not feel too guilty.


the more crumble and powdered sugar the better!
Pumpkin Muffin
½ cups all-purpose flour
1 cup sugar
1 teaspoon baking soda
½ teaspoon salt
½ teaspoons pumpkin pie spice
1 cup pure pumpkin
¼ cup milk
 cup melted butter
2 large eggs
1 teaspoon vanilla

Pumpkin Crumble
1 cup all-purpose flour
½ cup brown sugar, packed
2 heaping tablespoons sugar
1 teaspoon pumpkin pie spice
pinch of salt
6 tablespoons butter, melted

Preheat oven to 350˚F. Line a muffin pan with paper cupcake liners (this will make approximately 12-14 muffins).

Combine flour, sugar, baking soda, salt, and pumpkin pie spice in a medium size bowl and set aside. Combine pure pumpkin, milk, melted butter, eggs, and vanilla and mix well. Slowly add the flour mixture, and mix until well blended. Scoop mixture into prepared muffin pan (I added a heaping ¼ cup batter to each liner), and set aside.

To make pumpkin crumble, combine flour, brown sugar, sugar, pumpkin pie spice and salt, Stir to combine. Add melted butter and stir with a fork until crumbs form. Spoon crumble onto muffins pressing lightly on each. In my opinion, you can never have too much crumble. It's obviously the best part.


Bake for 20 minutes, and then cover with foil and bake for another 5 minutes until a toothpick inserted into muffin comes out clean. Cool and dust with powdered sugar. Don't forget the powder sugar dusting. It is essential. I fed one to Cory without the powdered sugar, and he thought they were too plain, but with the powdered sugar, mmmmm, mmmmm, mmmmm. Enjoy!

Wednesday, April 9, 2014

Key Lime Cookie Cups

Ever since Key West, Cory is obsessed with all things Key Lime so when I came across Pillsbury's new cake mix, cookie mix, and frosting I couldn't pass it up.


Rather than making boring ol' cookies, I decided to get a little creative with some key lime cookie cups. These were relatively simple to make, and they tasted great. Not to mention they were a cute mini snack that I didn't feel quite as guilty eating. Okay, here is what you'll need:


Key Lime Cookie Cups

1 box Pillsbury Key Lime cookie mix (and ingredients noted on box)
1 jar Pillsbury Key Lime frosting
1 cup graham cracker crumbs
3 T sugar
1/3 cup melted butter
1 lime


Preheat oven to 350 degrees.

Start by placing graham crackers in a Ziplock bag. Use a rolling pin to create crumbs. Mix together with sugar and melted butter in a small bowl. Next, prepare cookie mix as directed. For the life of me I cannot remember what additional ingredients you have to add to the cookie mix. I want to say butter and maybe an egg or two? Forgive me. I threw away the box last week, and there is no way I'm going to go rummaging through the garbage. :)


Next, in a mini muffin pan, place a heaping teaspoon of graham cracker crust in each cup. Use the back of the teaspoon to press the crumbs into the bottom firmly. Scoop cookie dough (about 1 tablespoon) on top of the graham cracker crust.


Place in the oven and bake for 10-12 minutes. After you remove the cookies from the oven, use the back of a teaspoon to press the cookies into the cups. Allow them to cool for several minutes. If you skip this step your crust will get stuck in the pan, and you'll be one sad baker. I'm impatient so I put the entire pan into the freezer for 5-10 minutes, and the cookie cups easily came out of the pan afterwards.

Once cooled, pipe key lime frosting onto each cookie cup with a star tip. Top with fresh grated lime zest or your favorite green sprinkles. Enjoy!


Sunday, January 19, 2014

Fruity Greek Yogurt Chicken Salad

So I'm trying this new thing where I actually eat protein, and don't sustain myself entirely on carbs and sugar...

I've never been a huge meat eater. I'll order it when I go out to eat, but as I've mentioned before, I hate to cook it myself. Last week I went to my parents' house on Sunday night and had my dad grill me up a package of chicken breasts. While they were quite tasty the first few days, I was so sick of chicken breast spinach salads come Wednesday. They were just too bland and boring so yesterday I decided to get creative, and I whipped up some healthy chicken salad. Needless to say I am much more excited for lunch this week...and I even cooked the chicken myself!


Fruity Greek Yogurt Chicken Salad

1 pound cooked chicken breast, shredded
1/2 cup diced red onion
1/2 cup diced Gala apple
2/3 cup green grapes, halved
1/3 cup dried cranberries
1/4 cup sliced almonds
1/2 cup plain Greek yogurt
1 T lemon juice
1/4 tsp garlic powder
salt and pepper to taste

Cook chicken breasts in a baking pan in a single layer at 400 degrees for approximately 20-25 minutes until no longer pink. Shred with two forks and place into large bowl.

Add red onion, apple, grapes, dried cranberries, and almonds. Mix in Greek yogurt, lemon juice, garlic powder, and salt and pepper. By my rough estimation I calculated the entire recipe is probably around 1,100 calories so if you divide it into four servings that's about 275 calories per serving. Not too shabby.


Serve on your favorite tortilla for a delicious wrap or even on a bed of lettuce. The options are endless!


Tuesday, July 30, 2013

Pad Thai

I've had a love affair with pad thai for awhile now. I used to get take out from Zen Zero at least once a week when I was in college, but until Sunday I had never tried to make it myself, and you know what guys? It was super easy!
Pad Thai with Chicken
adapted from Sandra Lee's recipe

2-3 large boneless, skinless chicken breasts
16-ounce package rice noodles
2 tablespoons olive oil
2 large eggs, beaten
1 T brown sugar
3 T soy sauce
1 T fish sauce
1 T chile sauce
1 T lime juice
1 T chopped garlic
1/2 cup chicken broth
1 carrot, grated
4 scallions, sliced thin
2 cups bean sprouts (I omitted these)
1/4 cup peanuts, coarsely chopped
1/4 cup fresh cilantro, roughly chopped

First things first - raw meat freaks me out. I don't like the look of it. I don't like the smell of it. I especially don't like the feel of it so anytime I make something that calls for meat, I start by delegating this task. Usually my dad is the lucky candidate, and Sunday was no different. While I did all the prep work in the kitchen, my dad tossed some chicken breasts on the grill because he's awesome like that.

Meanwhile back in the kitchen, bring a large pot of water to a boil and then turn off the heat. Add the rice noodles, and let them soften for approximately 2-3 minutes. I know. They cook fast. I would also suggest maybe tossing a little olive oil into the water because I had some issues with my noodles sticking together. Drain and set aside.

In a large skillet (if you are fancy and own a wok, use that. I obviously am not married yet so I don't have all the fun, fancy kitchen tools some of you own), add 1 tablespoon olive oil. Once it's hot, add the beaten eggs and cook until they are firm. Remove from the pan and roughly chop. Set aside.

In a small bowl, whisk together brown sugar, soy sauce, fish sauce, chile sauce, lime juice, garlic, and chicken broth. I ended up doubling the amounts called for above for all the previously mentioned ingredients because I didn't seem to have enough liquid to cover the noodles and the chicken later on so if you are having the same issue, try that. Set aside.

At this point hopefully your sous chef with have completed the chicken. :) Chop into quarter inch cubes, and set aside. Add the remaining tablespoon of olive oil to the skillet along with the carrots, scallions, and bean sprouts (if you are using them. I personally can't stand them. Thank goodness Jimmy Johns got rid of them and replaced them with onions. Smart choice JJ. Smart choice).  Stir fry 1 minute. Add the eggs, chicken, and sauce you previously set aside, stirring to coat everything. Cook for another minute. Garnish with peanuts and cilantro, and enjoy!

One step closer to checking off another item on my list of 28 Things Before 28. Only 5 more recipes to go!


Tuesday, July 16, 2013

The Best Blueberry Muffins EVER


I'm on a quest to check a few more things off my 28 Things Before 28 list since I've been majorly slacking. I figured a good place to start would be in the kitchen because let's get real - no way am I getting cozy with a snake anytime in the near future...especially not after my friend showed me this. I'm also so ridiculously sick of eating the same thing day in and day out. If I have to look at another protein bar, plate of eggs or fruit smoothie I might go insane. Plus, I need to teach myself to be domestic if I have any chance at all of ever landing myself a husband. Obviously. 

I seriously have enough recipes on my Pinterest boards to last a lifetime. On my breakfast/brunch board alone I have 173 pins. Have I ever made even one of them? Of course not. I think this is a good place to start. I need to be certain I can whip up a solid breakfast should I ever have any overnight house guests. ;) First up - THE best blueberry muffins ever...at least according to the recipe. Hopefully these live up to their high, high expectations. Let's get cookin'!


Blueberry Muffins

Streusel Topping

3 T sugar
3 T brown sugar
1/3 cup flour
5 T melted butter

Muffins
2 cups fresh blueberries
1 1/8 cups plus 1 teaspoon sugar
1 T water
2 1/2 cups all-purpose flour
2 1/2 teaspoons baking powder
1 teaspoon salt
2 large eggs
4 tablespoons unsalted butter, melted and cooled slightly
1/4 cup vegetable oil
1 cup buttermilk
2 teaspoons vanilla extract

Heat over to 425 degrees. Prepare muffin tins with nonstick cooking spray or liners. Bring 1 cup blueberries, water, and 1 teaspoon sugar to simmer in saucepan over medium heat. Cook (mashing berries with a fork) and stir frequently until berries have broken down and mixture is thickened. It should be reduced by about half. Transfer to a small bowl and cool to room temperature.

Whisk flour, baking powder, and salt together in a large bowl. Whisk remaining sugar and eggs together in medium bowl until thick. Slowly mix in butter and oil. Next add buttermilk and vanilla. Fold egg mixture and remaining cup blueberries into flour mixture until just moistened. Yuck. Hate that word. Batter should be very lumpy with a few spots of dry flour.

Divide batter equally among prepared muffin cups. It should completely fill the cups and mound slightly. Add a teaspoon of cooked berry mixture into the center of each mound of batter. Swirl berry filling into batter. The recipe said to use a chopstick. I didn't have any chopsticks laying around so I used a toothpick and it worked just fine. Sprinkle streusal over muffins and bake until muffin tops are golden. It should be around 15-17 minutes. Cool, then enjoy...or if you are impatient like me, eat right away and burn your tongue. Totally worth it.


Sunday, June 23, 2013

Buffalo Chicken Enchiladas

I never get sick of Mexican food ever. I'm absolutely positive that I could eat it for breakfast, lunch, and dinner every day for a week and still jump at the chance to go get some white queso with my roomies. Well...maybe not breakfast. Although sopapillas could count as breakfast so yes, breakfast, lunch, and dinner. Glad that's settled.


I also really enjoy cooking...but not for just myself which is why my weeknight meals usually consist of eggs, smoothies, or cereal. Tonight I had to go back to my parent's house so my daddy dearest could change the oil in my car so I decided to whip up a little something for my fam.

If you follow me on Pinterest you know my food boards are out of control. I have a serious, serious problem with food porn. I really just can't get enough. It's bad. I let my sister peruse my pins, but nothing was really calling out to her. She was craving buffalo wings, and I wanted Mexican so we compromised. Buffalo chicken enchiladas it was!

Buffalo Chicken Enchiladas


Large whole wheat tortillas
3 boneless, skinless chicken breasts
28 oz can red enchilada sauce
1/2 - 1 cup Buffalo sauce
1 cup shredded colby/monterey jack cheese blend
4 oz. gorgonzola cheese, crumbled
6 green onions, chopped
Fresh cilantro, chopped

Preheat oven to 375 degrees F. Spray a 9 x 13 in baking dish with non-stick spray.

I really despise touching raw meat so my dad was a dear and threw the chicken breast on the grill for me while I was doing the other prep work for this recipe, but if you want to cook the chicken in the oven that would work as well.

While chicken is cooking, pour enchilada sauce in a large bowl, and whisk in buffalo sauce. I thought I was using a 1/4 measuring cup. Turns out I was actually using 1/2 cup so I accidentally added an entire cup of buffalo sauce to the enchilada sauce. My mouth is still burning. If you like things hot by all means add a cup, but I would advise starting with 1/4 cup and taste testing until you reach your desired spiciness. Set aside.

In another bowl mix 2 chopped green onions with 1/2 cup shredded cheese. Pour in roughly 1/2 cup of the enchilada/buffalo sauce. Once chicken is cooked, shred with two forks and add to the green onion, cheese, sauce mixture and mix thoroughly.

Cover bottom of the baking dish with enchilada/buffalo sauce. Take each tortilla and fill with the chicken mixture. Roll and place in the baking dish, seam side down. I only ended up with 7 enchiladas, but some were very generously sized so you could easily get 8. Once all the enchiladas are rolled, pour another 1/2 cup (or more) of enchilada/buffalo sauce on top of the tortillas. Add remaining shredded cheese.

Bake for 20 minutes. While enchiladas are baking chop remaining green onions and cilantro. I don't do Mexican food without black beans so while the enchiladas were cooking, I also chopped and sauteed some white onion and heated with 2 cans of black beans on the stove.

Immediately after taking enchiladas out of the oven sprinkle the crumbled gorgonzola cheese on top. Garnish with green onions and cilantro and enjoy!

Saturday, June 22, 2013

How to Make THE Perfect Cake Pop

Many of you...okay three of you...have been requesting this for awhile and since I've got a four hour layover  in Atlanta with nothing to do besides people watch I decided to give the people what they want. Here it is - my long awaited post on the perfect cake pop.


There are a couple different ways you can go about making these babies. Sometimes you get home from work at 8:00 p.m. and you are completely exhausted and literally THE last thing on Earth you want to do is slave away in the kitchen for hours making cake pops for that engagement shower, bridal shower, baby shower. Why God why do I have so many friends doing all of the aforementioned things?!? In these instances, I highly advise using a boxed cake mix and store-bought frosting. My personal fave is Pillsbury Moist Supreme even though I despise that word. Moist. Ick. Feel free to try different brands. Experiment. Knock yourself out.

If you're feeling particularly ambitious, and you want to be showered with compliments then I suggest baking a White Almond Sour Cream cake. If you've never baked with almond extract before then you truly haven't lived my friend. Seriously. It's ah-maze-ing. I've even starting putting a little bit in chocolate chip cookies, but I've digressed. This is my go-to recipe for white cakes, and it has never disappointed. Ever. I'll even fill you in on a little secret - it starts with a boxed cake mix. Obviously you don't need to broadcast this to the universe. Let people think you are awesome. I won't tell if you don't tell. Your secret is safe with me. Note - This makes A LOT of cake so unless you are planning to feed a small army I would advise halving the recipe.


White Almond Sour Cream Cake 

2 boxes white cake mix
2 cups flour
2 cups sugar
1 1/2 tsp salt
8 egg whites
2 2/3 cup water
4 T vegetable oil
2 cups sour cream
2 tsp vanilla extract
2 tsp almond extract

Mix all the dry ingredients together. Slowly add egg whites, oil, sour cream and extract, being sure to mix well after each addition. Bake at 325 degrees in a greased 9 x 13 pan until toothpick inserted in center comes out clean.

After baking, let the cake cool for a couple minutes, but not completely. Start breaking up cake and transferring to a large bowl with a spoon. With two forks crumble the cake until you are left with ultra fine crumbs. The finer the better. I start with the center of the cake and slowly work my way outwards. I usually try to avoid using the harder, crispier edges because it creates lumps in your cake balls when you roll them. Also, I find it impossible to bake a cake without eating a little bit so if you don't use the edges it will give you a little something something to snack on throughout the remainder of the process. Prettier cake pops and a full belly - a win win in my opinion.


Next it's time to mix the cake crumbs with about 3/4 jar of frosting to form the "dough". Again, if you are ambitious you can make some from scratch, but if not, store-bought frosting will suffice. I usually use vanilla frosting for white cakes and chocolate for chocolate cake etc. but again you can switch it up here. Get creative. I find it helpful to refrigerate the dough for a little bit before rolling so it doesn't get quite as messy, but that is probably just my OCD anal-ness shining through. I don't like getting dirty.

Once the dough is chilled roll into balls, and insert lollipop sticks about 2/3 of the way through the ball. Then head back to the fridge/freezer (wherever you have space) to chill them until they're firm. This will make the chocolate coating much much easier.


If you want basic vanilla or chocolate cake pops then you can buy Almond Bark at just about any grocery store. If you want to be a little fancier then you can pick up colored candy melts at a baking supply store, Hobby Lobby, or Michael's. I also highly advise picking up some Paramount Crystals (also found at a baking supply store) to thin your chocolate. This will help ensure your chocolate coating goes on evenly. Start with a tablespoon, and you can always add more. Microwave chocolate and crystals for 30 seconds to start. Chocolate can be quite finicky, and there is no way to revive overcooked chocolate so after the first 30 seconds increase in 10-15 second increments. Be sure to stir chocolate each time to avoid overheating since it holds it's shape even when warm.

Remove cake pops from the freezer, and re-roll to remove any imperfections or lumps (if there are any). To coat with chocolate, I usually hold the cake pop in my left hand, and pour chocolate over the cake ball with a spoon in the other. Be sure to gently tap the cake pop against the side of the bowl to remove excess chocolate before placing on a cookie sheet to solidify completely. Lately I've been absolutely obsessed with edible glitter so I've been sprinkling that on once the cake pops are on the cookie sheet. I love sparkles on everything...even my food. If glitter isn't your thing you could also add sprinkles, or just leave them plain. I promise they'll taste delicious either way.

If your first batch doesn't turn out perfectly don't fret. We can't all be as perfect as me. I kid. I kid. Seriously though, the first time I made these they were ugly blobs.


If anyone has any other helpful pointers feel free to sound off in the comments. I'm always looking for ways to improve this process since I seem to be making them almost weekly. Can people stop getting married and having babies already? K thanks.

Monday, April 15, 2013

My first get together in the new house!

I absolutely adore party planning and entertaining, but in my tiny one bedroom apartment it just wasn't possible. Saturday night I had my first real party in the new house, and I think it was a success! There were some spills (a select group of people may or may not have reenacted our college days and played slap the bag with boxed wine in the kitchen, and a pink drink might have spilled on my white duvet), but it was nothing that couldn't be mopped up or washed out. I was even able to remain relatively calm and relinquish control so that I could actually enjoy myself. Surprising I know!

Get it girl!
I didn't plan very well, and scheduled the party the same day I was running a half marathon (that I did absolutely no training for and was therefore incredibly sore afterwards), but I survived and even PR'ed shaving about 6 minutes off my previous best time! So happy I can check another thing off my 28 Things Before 28 list which I feel like I have been completely slacking on!

I was a little nervous about where everyone was going to go during the party since my house is by no means large so Friday evening I made a trip to Lowe's and gathered materials to build a fire pit so people would mingle outside as well as inside. Shout out to Molly and Maggie for helping me carry 36 incredibly heavy and dusty rocks from my car to the backyard. Also, I would just like to say hah! to the worker at Lowe's who seemed very skeptical of my ability to build the fire pit. We sure did prove him wrong, and I must say I personally think we did a pretty stellar job! Now if only I can learn to build a fire... Luckily we had some Eagle Scouts in attendance who stepped up to the plate!

Since I was a little pressed for time on Saturday with the race in the morning, my roommates and I decided to go for easy appetizers. On the menu was pesto flat bread pizza from Trader Joe's (where else?), mozzarella tomato basil skewers, coconut shrimp, crackers and cheese, hummus and veggies, and chips and guac because no party is complete without guacamole. Ever. Obviously I also had three desserts since I have a sweet tooth that is impossible to satisfy. I made cake pops for a first communion last week so I whipped up some extras while I was at it, and also threw together some cupcakes and chocolate chip brownies on Saturday. I think everyone enjoyed the food considering the plates were wiped clean when I went to clean up the next morning, but the biggest hit was probably the punch. I started with this recipe for Pineapple Lemonade Sangria, but improvised slightly. Since I got several requests, below is what I think actually went into the punch I made:


Pineapple Lemonade Sangria

1 bottle of Chardonnay
1 bottle of Sauvignon Blanc
1/2 cup light rum
1/2 cup Triple Sec
3/4 cup simple syrup (2 parts water to 1 part sugar)
1/3 liter Diet Sprite
1 (12 oz) can frozen lemonade
1 large (20 oz) can pineapple chunks
1 Gala apple, unpeeled, cored and cut into chunks
10 strawberries, sliced thin
1 orange, sliced thin
1 lemon, sliced thin

I think I will definitely have to do a variation of this punch at our next get together since I never actually had a chance to try it this go-around. I foresee a Cinqo de Mayo party and lots of backyard BBQs in our future...especially since my patio furniture is being delivered tomorrow! 

Bring on summer!


Wednesday, February 27, 2013

At least this time I was prepared

Yesterday we had yet another snow storm in the Midwest. Wahhhhh wahhhh.

Snow days seem to have lost some of their appeal now that I'm older and in the working world. Instead of sitting in front of a computer screen at work all day I get to sit in front of my laptop screen at home. I'll admit it is nice to work from home in my pajamas all day, foregoing a shower if I so choose (one of the many benefits of being single and living alone with a cat - she doesn't care if my hair is so dirty it no longer looks blonde or if I walk around with zit cream on my face all day. Unconditional love right there), but all of our systems run so slow from home so everything takes ten times longer.

I about went crazy last week after being stranded in my apartment alone for two ENTIRE days without much food (thank goodness I had wine), and ZERO hope of getting my car out from behind a massive snow pile. This time I was prepared. No. I didn't go grocery shopping. That would just be crazy. This time I packed a bag and drove my butt over to my parent's house after work Monday night so I could at least have some sort of human interaction and food...lots of food.

Since I was at home with my mom and sister yesterday I decided to cook dinner for them. I really do love to cook and try new recipes, but by the time I get home from work or the gym at night it's usually late and I'm lazy and I don't want to cook an entire meal for just myself. Hence the reason why I eat egg sandwiches, cereal, or Trader Joe's soup literally every night.

Last night's menu consisted of tomato basil soup and my version of a grown up grilled cheese. It was pretty tasty, but I was stuffed afterwards. I'm talking uncomfortably full. Snow day snacking plus a big dinner in combination with my inability to run after hurting my knee skiing on Saturday is making me feel real good about myself, but that is beside the point. At least the soup was healthy-ish...

Here are the recipes if you are interested in trying them out:


Grown Up Grilled Cheese

one large white onion, sliced
walnuts, chopped
2 tbsp olive oil
Granny Smith apple, sliced thin
sourdough bread, sliced
butter
sharp cheddar cheese, sliced

Slice onions thinly and saute with chopped walnuts in olive oil until onions are caramelized. Onions should be a nice golden brown color. Don't look at my picture because mine were definitely a little crispy. I got a little distracted and cooked them way too long. Set onions aside. Thinly slice Granny Smith apple. Butter one side of bread, and place in pan. Add a slice of cheddar cheese then apple slices then caramelized onions and walnuts. If you want you can add another slice of cheese or just place the second piece of buttered bread on top. I tried it both ways, and it was definitely easier to flip with the extra slice of cheese...but that is also probably why I had a stomachache last night. Too much cheese. Cook until golden brown.

Tomato Basil Soup

3 cloves of garlic, minced
2 tbsp olive oil
two 14 oz. cans of crushed tomatoes
one 14 oz. can of whole tomatoes
2 cups of vegetable stock
1 tsp sea salt
1 tsp sugar
1/2 tsp ground black pepper
1/4 cup heavy cream
3 tbsp fresh basil, julienned
shaved Parmesan cheese

Saute garlic in olive oil on medium heat in a saucepan for 1 minute. Add the crushed tomatoes. Add the whole tomatoes one at a time, squeezing them into the pan to break them up. Next add the juice from the whole tomatoes, vegetable stock, salt, pepper, and sugar. Cook the soup on medium heat at a simmer for 10 minutes. Reduce the heat to low and stir in heavy cream and basil. I don't know if I just didn't do an adequate job of squeezing the whole tomatoes, but there were some pretty big chunks in the soup. I personally am not a huge fan of chunky soups so I think when I make this again I will blend in a food processor so it has a smoother consistency. Serve and top with Parmesan cheese.

Hopefully everyone survived the snow storm and that was the last of this winter weather! Lets all think warm thoughts!

Thursday, February 21, 2013

The Perfect Meal for a Snow Day

Instead of going to the grocery store and stocking up on the essentials last night like most people did, I chose to go to the gym for a quick run, and then proceeded to sit on my bum all night watching Real Housewives of Beverly Hills and the KU game. Kinnnnnnda regretting that decision now that I've been cooped up in my apartment all day with only frozen chicken breast, freezer burned edamame, half a jar of peanut butter, a stale bag of pretzels, and some Greek yogurt to tide me over until I get enough courage to brave the roads. Note to self - go grocery shopping more than once a month. Especially before a massive blizzard.

so so hungry. dyyyyyyyyyyyying right now.

In case any of you actually made it to the grocery store last night or have a well stocked pantry, you should try out this amazing vegetarian butternut squash chili I made a few months ago. It would be the perfect meal for a cold, snowy day. Seriously you MUST try it.....and it has avocados. Obviously it is amazing.

Chopping all these up is the hardest part.
I promise.
Vegetarian Butternut Squash Chipotle Chili with Avocado
Serves 4
  • 1 medium red onion, chopped
  • 2 red bell peppers, chopped
  • 1 small butternut squash
  • 4 garlic cloves, minced
  • 2 tablespoons olive oil
  • ground sea salt
  • 1 tablespoon chili powder
  • 1 teaspoon ground cumin
  • 1 tablespoon chopped chipotle in adobo
  • 1 bay leaf
  • 1/4 teaspoon ground cinnamon
  • 14 ounce canned diced tomatoes (including the liquid)
  • 2 cans of black beans, rinsed and drained
  • 2 cups vegetable broth
  • 2 avocados, diced
  • cilantro (optional)
  • 3 corn tortillas for crispy tortilla strips

Start by chopping up the onion, bell peppers, squash, and garlic. Toss into a large stockpot or Dutch oven with 2 tablespoons of olive oil on medium-high heat. Be sure to stir every few minutes so the veggies cook evenly. Once the onions start becoming translucent, turn the heat down to medium-low.

Add the salt, chili powder, cumin, chipotle, bay leaf, cinnamon, tomatoes, black beans, vegetable broth, and stir. If you are like me, and have never heard of chipotle in adobo you can find it in the Mexican food section of the grocery store. It took me and the Hen House worker a good 10 minutes to find it, but eventually we struck gold! 

Cover for approximately one hour, stirring occasionally. Simple enough right? You can taste test occasionally and add additional chipotle if desired. I think I ended up adding another 1/2 tablespoon when I made it, but it is completely up to you. After an hour the butternut squash should be tender and the liquid should have reduced so you are left with a thick chili consistency. 

If you want to add a little crunch to your chili, you can cut a few corn tortillas into tiny little strips (approximately 2 in long), and heat them in a small pan over medium heat with a little olive oil. Be sure to sprinkle with salt and stir occasionally. Cook until the strips are crispy and turning golden. Remove from the skillet and place on a paper towel to absorb some of the oil while you are dicing up the avocados. Now that I think about I do still have some corn tortillas. Maybe I can at least make some tortilla "chips" to munch on today. Hmmmm....

If you want to get fancy (and take a great Instagram pic) chop up some cilantro as a garnish. I promise you won't be disappointed if you make this! Now if only I could get to the grocery store... Guess I will have to settle for salivating over my Recipes Board on Pinterest. Depressing.

Hope everyone in the Midwest is surviving Winter Storm Q (since when do we name winter storms?!?) and having a great snow day!

Wednesday, January 16, 2013

Will you accept this rose?

Every season I tell myself I'm not going to get sucked into the Bachelor yet every season I just keep coming back for more. It doesn't matter that this is Season 17 and only one, yes one, of the bachelors actually ended up marrying someone on the show - and get this. He didn't even marry the contestant he chose in the finale. He ended up breaking off their engagement on live tv none-the-less and asking for another chance with the runner-up. How messed up is that? Apparently he made the right decision though because they are now married and expecting their first child. Still not cool Jason. Not cool at all.

Back in Cincinnati my friends and I would have viewing parties on Monday nights (it makes me feel a little better about watching the show if I'm not sitting on my couch alone...with my cat) so I've decided to start weekly watch parties with my lovely KC friends. If nothing else it is a good excuse to get together, gossip, drink some wine/champagne, and be thankful that none of us are as cray-cray as the girls on this show. Thank the lord.

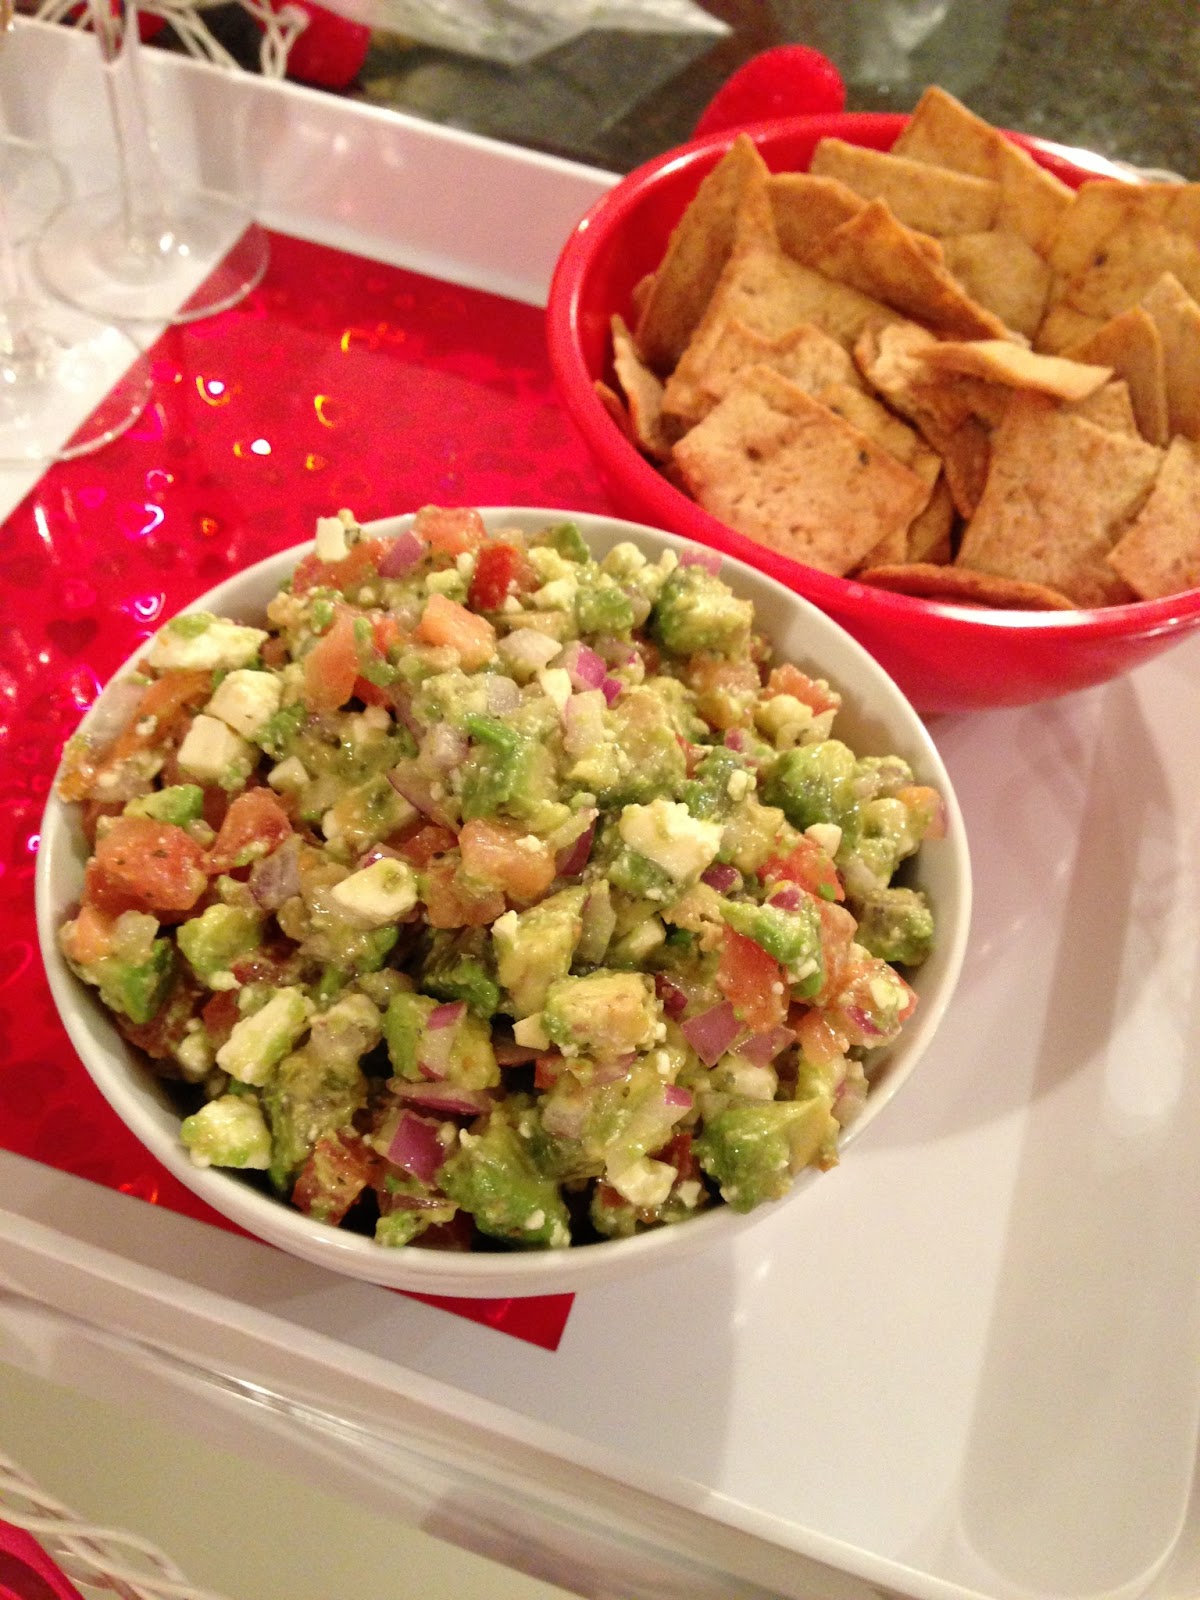
This week it was my turn to host the watch party so after perusing Pinterest I decided I was going to try a new recipe for Avocado Feta Dip served with pita chips. This dip was super easy to throw together after work, and I think everyone really liked it. In my opinion, as long as pita chips are involved you can't go wrong. Although you might not want to take my word for it because I have an unhealthy addiction. I fear one day you might see me on Intervention eating Stacy's pita chips out of a garbage can. Seriously. It is that bad.

Here is the recipe for the dip if you want to try it out:


Avocado Feta Dip

2 ripe avocados, diced
1 tomato, finely chopped
1/4 cup red onion, finely chopped
1 garlic clove, minced
6 oz. feta cheese
1 T fresh oregano
1 T olive oil
1 T white wine vinegar

This recipe is pretty straight forward. Just chop up the avocado, tomato, onion, and garlic. Then mix together with the feta, oregano, olive oil, and vinegar. It is that simple! In my mad rush at the grocery store on Sunday I forgot to buy fresh oregano so I had to settle for dried oregano (I only used 1/2 T and I think that was plenty). I also only bought a 4 oz. container of feta, but that seemed to work just fine as well.

If you know me at all, then you obviously know I would never dream of hosting a get-together without serving dessert. I had to be in Lawrence by 4:00 p.m. on Sunday to watch my baby sis perform her dance team nationals routines (Rock Chalk!), and didn't end up making it to the grocery until an hour or so before that so I cheated slightly. I might have picked up store-bought sugar cookies. Don't judge me. I did however use my new mixer to make buttercream frosting from scratch, and threw together these rose cookies pretty quickly.

Not the prettiest things I've ever made, but they worked!

Finally, what Bachelor watch party is complete without a little bubbly?!? I picked up a bottle of Spumante and some raspberries, and put my champagne flutes to good use since I didn't have a chance to whip them out on NYE.


I love entertaining, but it is a little tricky in my one bedroom apartment. Hopefully (if everything works out) I will have a house to host parties at in the coming months (fingers crossed I can find something I like that is actually within my price range). I'm looking at my first house tomorrow evening, but I will have to have an entirely separate post about that later! All in all I think I had a pretty good spread at my first Kansas City Bachelor watch party. Hopefully my friends enjoyed themselves as much as I did!


Until next week (when I will probably change my mind), TEAM DESIREE!